Between CSS3 transitions, @keyframe animations, and wonderful new technologies like the upcoming Web Animations API(opens in new tab), we've never had more control when it comes to building animations on the web.
There’s still one thing that none of these technologies can handle out of the box, though; animated list reordering.
Link to this headingIdentifying The Problem
Let’s say you have this component:
class ArticleList extends Component {
  render() {
    return (
      <div id="article-list">
        {this.props.articles.map(article => (
          <Article key={article.id} {...article} />
        ))}
      </div>
    );
  }
}
We have a parent ArticleList component which takes a list of articles as its props. It maps through them, in order, and renders them.
If that list order changes (examples: the user toggles a setting that changes the sorting, an item gets upvoted and changes position, new data comes in from the server…), React reconciles the two states, and updates the DOM, creating new nodes, moving existing nodes, or destroying nodes.
If an item is removed from its original location and re-inserted at a new location 200px down, it has no awareness about what that update means for the element’s on-screen position.
Because the element’s CSS properties haven’t changed, there is no way to use CSS transitions to animate this change.
How can we get the browser to behave as though these elements have moved? The solution to this problem will take us on a ride through low-level DOM operations, React lifecycle methods, and hardware-accelerated CSS practices. There will even be some basic maths!
Link to this headingThe solution
To solve this problem, there are a few pieces of info we need, and we need them at a very specific moment in time. Let’s forego the complexity in acquiring them, for now, and operate on the assumptions that:
- We know that React just re-rendered, and the DOM nodes have been re-arranged.
- The browser hasn’t painted yet. Even though the DOM nodes are in their new positions, the on-screen elements haven’t been updated yet.
- We know where the elements are, on the screen.
- We know where the elements are about to be re-painted.
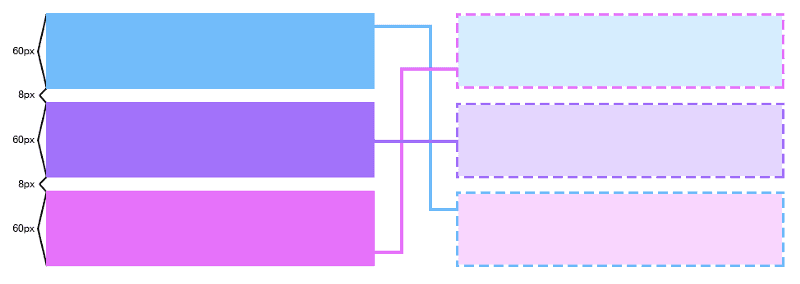
Here’s what our situation might be: We have a list of 3 items, and they were just reversed. We know their original position (left side), and we know where they’re moving to (right side).
Link to this headingOrder of Operations
A quick aside: It may surprise you to learn that there exists a moment in time where we can tell where an item will be before it has been painted to the screen.
When you think about it, it makes sense; how can the browser paint new pixels to the screen before it knows exactly where to paint them?
Thankfully, this is not a black box; The browser updates in distinct steps, and it is possible to execute logic between calculating the layout and painting to the screen.
But how do we access the calculated layout?
Link to this headingDOMRects to the rescue!
DOM nodes have an incredibly helpful native method, getBoundingClientRect(opens in new tab). It gives us the size and position of the target element relative to the viewport. Here’s what it might give us if we called it on that top blue rectangle, before the new layout is calculated:
blueItem.getBoundingClientRect();
// {
//   top: 0,
//   bottom: 600,
//   left: 0,
//   right: 500,
//   height: 60,
//   width: 400
// }
And, after the new layout is calculated:
blueItem.getBoundingClientRect();
// {
//   top: 136,
//   bottom: 464,
//   left: 0,
//   right: 500,
//   height: 60,
//   width: 400
// }
getBoundingClientRect is smart enough to work out the new layout position of an element, taking into account its height, margin, and any other variables that will affect where it is in the viewport.
Armed with these two pieces of data, we can work out the change in the element’s position; its delta.
Δy = finalTop - initialTop = 132 - 0 = 132So, we know that the element has moved down 132px. Similarly, we know that the middle item hasn’t moved at all (Δy = 0px), and the last item has moved up by 132px (Δy = -132px).
The problem is, while we know all these facts, the DOM is about to update; In the blink of an eye, those boxes will instantly be in their new position!
This is where the next tool in our arsenal comes in: requestAnimationFrame(opens in new tab).
This is a method on the window object that tells the browser “Hey, before you paint any changes to the screen, can you run this bit of code first?”. It’s a way to quickly make any adjustments needed before the elements are updated.
What if, before the browser paints, we apply the inverse of the change? Imagine this CSS:
.blue-item {
  top: -132px;
}

.purple-item {
  top: 0;
}

.fuscia-item {
  top: 132px;
}
The browser would paint this update, but the paint wouldn’t change anything; The DOM nodes have changed places, but we’ve offset that change with CSS.
This is tricky business, so let’s do a high-level overview of what just happened:
- React renders our initial state, with the blue item on top. We use getBoundingClientRect to figure out where the items are positioned.
- React receives new props: the items have been reversed! Now the blue item is on the bottom.
- We use getBoundingClientRect to figure out where the items are now, and calculate the change in positions.
- We use requestAnimationFrame to tell the DOM to apply some CSS that undoes this new change; If the element’s new position is 100px lower, we apply CSS to make it 100px higher.
Link to this headingIt’s Animation Time
Ok, so we’ve definitely accomplished something here; we’ve made it so that DOM changes are completely invisible to the user. This might be a neat party trick, but it’s probably still not clear how this helps us.
The thing is, we’ve made it so that we’re in a situation where regular CSS transitions can work again. To animate these elements to their new position, we can add a transition and undo the artificial position changes.
Continuing with our example above: Our blue item is actually the final item, but it appears to be the first one. Its CSS looks like this:
.blue-item {
  top: -132px;
}
Now, let’s update the CSS so it looks like this:
.blue-item {
  transition: top 500ms;
  top: 0;
}
The blue item will now slide down, over half a second, from the top position to the bottom position. Huzzah! We’ve animated something.
This technique was popularized by Google’s Paul Lewis, and he calls it the FLIP technique(opens in new tab). FLIP is an acronym for First, Last, Inverse, Play.
- Calculate the First position.
- Calculate the Last position.
- Invert the positions
- Play the animation
Our version is a little different, but it’s the same principle.
Link to this headingA Brief Foray into the DOM
While learning about this technique and writing my module, I learned quite a bit about DOM rendering. While most of what I learned is out of the scope of this article, there’s one tidbit we should take a quick look at: the difference between painting and compositing, and its effect on selecting hardware-accelerated CSS properties.
Originally, browsers did everything with the CPU. In recent years, some very smart people figured out that certain tasks could be delegated to the GPU for massive gains in performance; specifically, when the “texture” of a static piece of content doesn’t change.
The primary objective was to speed up scrolling; when you scroll down a page, none of the elements are changing, they’re just sliding up. The browser people were kind enough to also allow certain css properties to work the same way.
By using the transform suite of CSS properties — translate, scale, rotate, skew, etc — and opacity, we aren’t changing the texture of an element. And if the texture doesn’t change, it doesn’t have to be re-painted on every frame; it can be composited around by the GPU. This is how to achieve 60+fps animations.
If you’d like to learn more about the browser’s rendering process (and you should! It’s as fascinating as it is practical), I’ve included some links below.
In our case, though, it means we should be using transform instead of top:
.blue-item {
  transition: transform 500ms;
  transform: translateY(0px);
}
Link to this headingThe missing piece: React
How does React fit into all this? Happily, it turns out React works brilliantly with this technique.
There are two important things that each child needs for this to function:
- Every child needs a unique ‘key’ property. This is what we’ll use to tell them apart.
- Every child needs a ref, so that we’ll be able to look up the DOM node and calculate its bounding box.
Link to this headingGetting the First position
Whenever the component receives new props, we need to check if an animation is necessary. The earliest opportunity to do this is in componentWillReceiveProps(opens in new tab) lifecycle method.
class ArticleList extends Component {
  componentWillReceiveProps() {
    this.props.children.forEach(child => {
      // Find the ref for this specific child.
      const ref = this.refs[child.key];

      // Look up the DOM node
      const domNode = ReactDOM.findDOMNode(ref);

      // Calculate the bounding box
      const boundingBox = domNode.getBoundingClientRect();

      // Store that box in the state, by its key.
      this.setState({
        [child.key]: boundingBox,
      });
    });
  }
}
At the end of this lifecycle method, our state will be full of DOMRect objects, outlining exactly where every child is on the page.
Link to this headingGetting the Last position
The next task is figuring out where things are going to be.
The very important distinction to make here is that React’s render method doesn’t immediately paint to the screen. I’m a little fuzzy on the lower-level details, but the process looks a little something like this:
- render returns a representation of what it would like the DOM to be,
- React reconciles this representation with the actual state of the DOM, and applies the differences,
- The browser notices that something has changed, and calculates the new layout,
- React’s componentDidUpdate(opens in new tab) lifecycle method fires,
- The browser paints the changes to the screen.
The beautiful thing about this process is we have the opportunity to hook into the DOM’s state after its layout is calculated, but before the screen has been updated.
Here’s what that looks like:
componentDidUpdate(previousProps) {
  previousProps.children.forEach(child => {
    let domNode  = ReactDOM.findDOMNode(this.refs[child.key]);
    const newBox = domNode.getBoundingClientRect();

    // ...more to come
  });
}
Link to this headingInverting
We now know both the first and last position, and there isn’t a millisecond to spare! The DOM is about to update!
We’ll use requestAnimationFrame to ensure our changes make it in before that frame.
Let’s continue writing the componentDidUpdate method:
componentDidUpdate(previousProps) {
  previousProps.children.forEach(child => {
    let domNode = ReactDOM.findDOMNode(this.refs[child.key]);

    const newBox = domNode.getBoundingClientRect();
    const oldBox = this.state[key];

    const deltaX = oldBox.left - newBox.left;
    const deltaY = oldBox.top  - newBox.top;

    requestAnimationFrame(() => {
      // Before the DOM paints, Invert it to its old position
      domNode.style.transform = `translate(${deltaX}px, ${deltaY}px)`;
      // Ensure it inverts it immediately
      domNode.style.transition = 'transform 0s';
    });
  });
}
At this point, after this method runs, our DOM nodes will have been re-arranged, but their position on the screen will have remained static. Cool! There’s only one step left…
Link to this headingPlaying
componentDidUpdate(previousProps) {
  previousProps.children.forEach(child => {
    let domNode = ReactDOM.findDOMNode(this.refs[child.key]);

    const newBox = domNode.getBoundingClientRect();
    const oldBox = this.state[key];

    const deltaX = oldBox.left - newBox.left;
    const deltaY = oldBox.top  - newBox.top;

    requestAnimationFrame(() => {
      domNode.style.transform  = `translate(${deltaX}px, ${deltaY}px)`;
      domNode.style.transition = 'transform 0s';

      requestAnimationFrame(() => {
        // In order to get the animation to play, we'll need to wait for
        // the 'invert' animation frame to finish, so that its inverted
        // position has propagated to the DOM.
        //
        // Then, we remove the transform, reverting it to its natural
        // state, and apply a transition so it does so smoothly.
        domNode.style.transform  = '';
        domNode.style.transition = 'transform 500ms';
      });
    });
  });
}
Hah! We have done it; we have animated the unanimatable.
Link to this headingFurther Reading on DOM Rendering
Link to this headingAcknowledgements
- Ryan Florence created a wonderful module, Magic Move(opens in new tab), which solves the same problem, albeit in a totally different way.
- Paul Lewis coined the term FLIP, and the ideas used here come from his fantastic blog post, FLIP your Animations(opens in new tab).
- Sacha Greif and Tom Coleman’s book, Discover Meteor(opens in new tab), contains a chapter on animations, and they tackle this problem in a very similar way.
This article was originally posted on Medium(opens in new tab).
Last updated on
February 15th, 2016